Zebra Plastic Card Printers.

Zebra Plastic Card Printers come in a variety of styles and price ranges, including single-sided printers, dual sided printers, and security printers

Healthy Solutions for Healthcare.

The healthcare industry benefits from barcoding. Barcoding enhances patient safety and operational efficiency.

Seagull Scientific Products

Seagull Scientific BarTender is an industry-leading label design and barcode software. Seagull Scientific also develops true Windows printer drivers for bar code and thermal printers.

MC 9190G

The Ability To Satisfy Your Company Software Requirements.

Wireless Broadband

The unrivalled Motorola portfolio of Point-to-Point (PTP), Point-to-Multipoint (PMP), and Mesh Wide Area Network (MWAN), WLAN and VoWLAN solutions make governments, enterprises, and service providers more agile by helping them deploy voice, video, and data applications right where they need them.

Showing posts with label Scanner. Show all posts

Thursday, 4 October 2012

NEW: Cost-Saving Bluetooth Barcode-Scanner App

Wireless Barcode-Scanner

TEC-IT is proud to publish a new Android app named Wireless Barcode Scanner. It is used as simple and cost-saving alternative to handheld Bluetooth barcode scanners.

Scanned bar-codes are sent via Bluetooth to the connected PC
Wireless Barcode Scanner scans bar-codes with the built-in camera and transmits the data immediately via Bluetooth™ to your PC or Mac. Linear and 2-D codes are supported.

Additional software is not required. The scanned bar codes are available immediately via a virtual serial port (COM or RS232 port) on your computer using standard tools.

Features

  • Wireless Barcode Scanner is extremely easy to setup and use. Just pair your computer with your Android and scan bar-codes remotely. That's it.
  • The app detects and decodes common linear and 2D bar-codes fast and reliable.
  • Wireless Barcode Scanner is able to scan bar-codes in single-shot or batch mode. In single-shot mode barcodes are scanned one by one, in batch-mode the app scans barcodes automatically until interrupted by the user.
  • No data loss! The app logs all scanned barcodes locally on the device for later (re-)sending.
  • The Bluetooth connection state or failed bar-code scans are signaled to the user immediately.
  • Wireless Barcode Scanner works as Bluetooth Master (supporting SPP - Serial Port Profile). Once paired with the computer, the barcode data can be read with standard software tools from a so-called virtual serial port (RS232 or COM-port).
  • The app is available for enterprise licensing (no Google Play account required). Contact TEC-IT for details.
  • Last but not least, Wireless Barcode Scanner supports adjustable barcode prefixes, barcode suffixes and decoder character sets.

User Manual

In order to use your Android as Bluetooth barcode scanner you need to perform the steps listed below. This guide is valid for PC users, a short manual for Mac users is available in the Help menu of the app itself.
  1. On your Android: Activate Bluetooth
  2. Make your Android discoverable so it's visible to all nearby Bluetooth devices (see Android Settings)
  3. Start Wireless Barcode Scanner
  4. On your PC: Click Add a device (see Control Panel)
  5. Wait a few seconds until your Android was discovered by the PC
  6. Follow the instructions to pair the devices
  7. To find out the assigned COM port number right click on the device in Devices and Printers, select Properties, switch to the Services tab and look for an entry named Serial port (SPP) BlueScanner
  8. Use your preferred program to capture the serial data, TEC-IT recommends the keyboard wedge software TWedge for professional data collection tasks.
Please note: If Wireless Barcode Scanner was not started on your Android before pairing, the service Serial Port (SPP) BlueScanner remains unchecked and no COM port number will be assigned to the Bluetooth connection. In this case check the SPP-service and close the dialog with OK. Then retry step 7 above.

Download

QR-Code Scanning
Use Google Play to install the free demo or to purchase the full version. For those without access to Google Play, the application package (APK) can be downloaded from TEC-IT's website.

Feedback

TEC-IT appreciates product feedback and enhancement requests from users. Please contact us via email or comment this blog post.

Tuesday, 24 April 2012

How to use Microvision ROV Bluetooth Barcode Scanner

Dealing with a Microvision ROV barcode scanner can be quite tricky. Of course, the device is scanning bar-codes immediately. But the data is sent in a special format and requires a confirmation by the receiver. That's the reason for this blog entry.

By default the ROV scanner (in our case a MS2200-BT) buffers all scanned bar codes internally. The receiver (e.g. your PC or smartphone) is required to confirm each received bar code to delete it from the ROV's memory. If such a confirmation is missing the ROV scanner sends the same bar code over and over.

The ROV scanner appends a 4 digit serialization number to each scanned bar-code. This serialization number is sent (along with the barcode data) to the receiver. The receiving device is required to acknowledge the bar-code by sending back the serialization number along with an appended ACK character (hex 06) to the ROV scanner.

Now let's demonstrate how to configure TEC-IT's software wedge TWedge to work with a Microvision ROV scanner.

Use a Microvision ROV Scanner With TWedge

TWedge is a software solution for reading data from RS232, USB (via virtual serial ports), TCP/IP and Bluetooth devices. The built-in scripting capabilities enable you to process the received data (e.g. send the data to any application by simulating keystrokes) or to implement the confirmation scenario outlined above.

Use this JavaScript snippet for the OnData section in the script editor of TWedge (you may also download the TWI).

TWedge OnData Script for Microvision ROV MS2200-BT

var myData;
var SerializationNumber;

myData = DATA.replace (/\x02/g, "");        // remove {STX}
myData = myData.replace (/\x0D\x0A/g, "");  // remove {CRLF}

// Microvision's documentation says the following:
//
// The serialization number are represented by the last four digits of the bar code.
// Send the serialization number with an ACK (hex 06) character to the
// scanner to acknowledge and delete the bar code. If the scanner has bar
// codes buffered then it sends the first stored bar code, deletes that
// bar code after it is acknowledged, and then sends the next stored bar
// code. This process continues until all bar codes have been sent.
SerializationNumber = Right (myData, 4);
WriteToDevice (SerializationNumber + "\x06", 500);  

// Prepare the read data to simulate keystrokes (remove Serialization Number)
myData = Left (myData, myData.length - 4);

SendKeyStrokes(myData.replace (/\x00/g, " "));
SendKeyStrokes("{ENTER}");

Give it a try!

Download and check out the software wedge TWedge for free. The finished configuration file (TWI file) for this blog post is available here.

Comments and suggestions regarding this article are welcome. Please feel free to contact us via MSN or email if you are facing any problems.

Update

The post How to use a Microvision ROV bar-code scanner with Android explains how to configure the scanner to work without serial numbers, buffering or special protocol requirements.

About TEC-IT

WWW.TEC-IT.COM
TEC-IT Datenverarbeitung GmbH provides high quality software in the areas of bar-coding, barcode extensions for ERP systems, label and form printing, reporting and automated data acquisition. TEC-IT products are available for all major platforms, thus customers benefit from complete and versatile software solutions for all possible requirements. The company is located in Austria / Europe and can be reached via www.tec-it.com.
All trademarks are the property of their respective owners.

Tuesday, 11 January 2011

BluePiano: A New Android Bluetooth Input Method

BluePiano Bluetooth Input Method for Android
The input method BluePiano extends Android with Bluetooth data acquisition.

This new input method provides a Bluetooth-enabled soft-keyboard. This soft-keyboard captures Bluetooth data and forwards the received data to input fields of arbitrary apps. The data appears as entered by the user (watch the video on YouTube).

BluePiano is typically used for barcode scanning with external Bluetooth barcode-scanners or for generic data acquisition tasks (e.g. to capture raw external GPS or medical device data). English, German, French, Russian and Swedish keyboard layouts are available.

BluePiano is easy to use and provides you with connectivity feedback in the notification bar. For backup purposes BluePiano is also able to scan barcodes using camera barcode scanners (using the built-in or an external camera scanner app).

BluePiano works with all Bluetooth SPP devices (Bluetooth devices supporting the Serial Port Profile, RFCOMM). Special Android-enabled bar code scanners are NOT required. HID devices are not supported.

Video Tutorial


Installation

Download and install BluePiano from Android Market (see market://search?q=pname:com.tecit.android.bluepiano.demo). After installation a wizard guides you through the following steps:
BluePiano Logo
  1. Activate Bluetooth
    See also: Android Settings – Wireless & networks.
  2. Discover your Bluetooth device
    Please note that the Bluetooth device must be “discoverable”. See also: Android Settings – Wireless & networks – Bluetooth settings.
  3. Pair your handset with your Bluetooth device.
    You need to enter the pairing PIN on your handset. See also: Android Settings – Wireless & networks – Bluetooth settings.
  4. Adjust the Bluetooth device as input device for BluePiano.
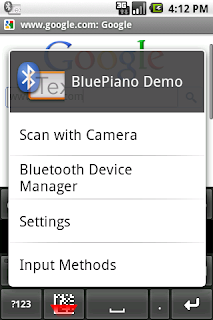
    All data received from this input device will be transformed and treated like any other manual input. You may also long tap the ?123 key on the BluePiano keyboard and then invoke Bluetooth Device Manager.
  5. Enable the input method BluePiano
    In order to use the new soft-keyboard you need to enable it in Android Settings. Confirm the security question. See also Android Settings -- Language & keyboard.
  6. Activate the input method
    Do this by long-tapping on any text field of any app. In the upcoming menu select Input Method and check the BluePiano input method. Use the same method to activate your default keyboard again.
  7. Finished!
    Now read a barcode with the external Bluetooth device (e.g. barcode scanner). As soon as the data is received by BluePiano it is entered into the current edit field. As an alternative you may press the barcode key on the BluePiano keyboard: The built-in camera scanner is invoked, the barcode is decoded and the data is entered automatically into the active edit field.

BluePiano Settings - Manual

Configure BluePiano using the installed wizard or navigate to Android Settings -- Language & keyboard and then select BluePiano.

As an alternative you may long-press on the ?123 key of the BluePiano keyboard. In the upcoming option menu select the required function.


Keyboard Options 

BluePiano Settings
  • Data Prefix
    Use the placeholders ${ENTER},${TAB}, ${BACKSPACE}, ${DOWN},${UP}, ${LEFT} and ${RIGHT} to control the cursor or input focus before the captured data is inserted into the input field of the current app. The placeholders specified above can be abbreviated with${E}, ${T}, ${B}, ${D}, ${U}, ${L} and ${R}. A multiplier specified immediately after the placeholder (e.g. ${E5}) instructs BluePiano to simulate the specified key n times (5 times the Enter key in this example).
  • Data Suffix
    Use the same placeholders as above to control the cursor or input focus after captured data was inserted into the input field of the current app.
  • Camera Scanner
    The default setting “Internal Scanner” reads bar-codes using the camera bar-code scanner integrated into BluePiano. If you prefer to select the camera scanner to be used each time, select Always ask. If a specific app is selected, the software always uses exactly this camera scanner app without asking.
  • Search Key Function
    This entry specifies the action when the hardware search key is pressed (this key is usually marked with a magnifier symbol, it is also available on the hardware keyboard): Invoke Camera Scanner opens the camera scanner when this key is pressed (you do not need to activate the soft-keyboard beforehand). In this case the search key acts as hot-key for barcode scanning.
    Choose Do nothing if you do not want to change the default behavior of the standard search key.

Bluetooth Options

BluePiano Settings Part 2
  • Manage Device
    Use this function to adjusted the Bluetooth input device. Keep in mind that the device must be paired before it can be used. See also: Android Settings – Wireless & networks – Bluetooth settings. This function is only enabled if the Bluetooth connection is not suspended.
  • Suspend Connection
    Temporarily disable BluePiano Bluetooth connectivity.
  • Suspend Timeout
    If a Bluetooth device is unavailable for more than the specified number of seconds (e.g. out of range or switched off) it will be suspended. If a device is suspended you can’t capture Bluetooth data with BluePiano. A notification is displayed and you need to re-activate the device manually. The default timeout is 120 seconds (2 minutes).
  • Vibrate on Error
    If activated, your handset vibrates in case of Bluetooth or connection errors.
  • Disaster Recovery
    Some handset models are using buggy Bluetooth stacks (firmware with Bluetooth SPP errors). This SPP bug makes it impossible to connect to a Bluetooth SPP device. If you experience this problem we recommend rebooting your phone, to restart Bluetooth manually or to instruct BluePiano to restart the Bluetooth service automatically. Please note that until now no reliable solution to this problem is available.

General Options

  • User Manual
    Link to this blog-post.
  • YouTube videos
    Link to TEC-IT’s YouTube channel.
  • License Check
    Checks and displays your current license for BluePiano.
  • About
    Displays copyright and credits for 3rd party software.

Feedback Please!

Feedback and feature requests are highly welcome. Just contact TEC-IT.

Monday, 4 May 2009

Scan & Store: Scan Barcodes directly into any Database

Are you looking for a basic inventory solution or you are just interested in registering items based on their barcode?

The data acquisition software TWedge provides an elegant solution - TWedge captures data from arbitrary devices (like a serial or USB barcode scanner) and can be configured to store captured data directly into any ODBC database.

Additional database software is NOT required! 

Smart Software Wedge

Configuration of TWedge is extremely flexible: The data acquisition functionality can be configured to meet your exact requirements. TWedge is able to perform read/write access to files, databases and may also simulate keystrokes.

To implement the required functionality you need:

  • A serial (or USB) barcode scanner. The used COM port as well as the interface parameters are important (most likely it will be 9600,N,8,1 - meaning 9600 bits per second, no parity, 8 data bits, 1 stop bit)
  • TWedge (download)

Determine Bluetooth COM Port

For this example I use a Bluetooth bar code scanner (Metrologic Voyager). The scanner provides scanned data via COM3. This serial interface was adjusted manually in the services dialog of the available Bluetooth Devices on Microsoft Windows:

Configure TWedge Interface

Now start TWedge and configure the interface parameters. Adjust COM3 as displayed in the Bluetooth dialog above:

Test Scanner Communication

The next step is to test the interface configuration: just start communication in TWedge. Whenever you scan a barcode the number should appear in the protocol window:

Provide a Database

Now its time to connect the barcode scanner with a database. For demonstration purposes we use an empty database which was pre-installed by the setup application of TWedge:  A so-called System DSN which is named TWedge_Sample.

On 32 bit Windows you can check out the installed DSN by opening the Data Sources (ODBC) administration (Windows Control Panel - Administrative Tools - Set up data sources (ODBC)). If you are running Vista x64 then execute the command c:\windows\SysWOW64\odbcad32.exe to view this dialog:

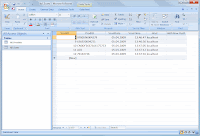
On Vista systems the database is usually stored in the folder C:\ProgramData\TEC-IT\TWedge\2.1\Examples\Database. When you open this database with Microsoft Access you see two tables. The example below stores captured data in the initial empty table tbl_Scans:

Configure Software Wedge

In order to configure TWedge open the script editor and select the predefined template which is named Database - Write. Double click it and close the script editor. This script reads data from the configured interface, determines the current date and time and enters the scanned data in the database mentioned above.

Data Acquisition

Start device communication again and scan some barcodes:

Finished! Barcodes are stored in Database

That's all! TWedge connects to the barcode scanner via the configured COM3. It waits for scans - and whenever a barcode was scanned it enters the barcode number into the database. And this is the result– the scanned barcodes are stored with some additional information like date/time and hostname:

Saturday, 8 November 2008

Software Wedge - Data Acquisition Software

Beside barcode, labeling and reporting software TEC-IT offers software tools for data acquisition. One of these tools is named TWedge - a software wedge.

The main purpose of such a software wedge (also named keyboard wedge) is to transform data read from an external device (connected via RS232, RS485, serial, COM, USB, Bluetooth or TCP/IP) into keyboard strokes. These keyboard strokes are then be forwarded to arbitrary applications. Using such middleware it is possible to automate data acquisition tasks - even with software applications which are not able to communicate with devices directly (e.g. like using a serial barcode scanner with Microsoft Excel).

The existing version of TWedge fulfills its main purpose perfectly. Serial data is captured and forwarded to applications. But customers often require powerful possibilities for adjusting and modifying data prior it is forwarded to a target application.

The solution to this problem? Scripting!

The new version of TWedge supports JavaScript(tm). Thus customers are able to do more or less everything with TWedge. Received data can be transformed, modified, checked and adjusted. But the most interesting point is, that TEC-IT extended JavaScript with direct database and file access. In other words: the upcoming version of TWedge enables users to store data directly into ODBC databases and files. It is also possible to implement complex application logic in JavaScript.

If interested just contact TEC-IT. A release candidate is available for testing!